New reports features!

Access settings

With this new feature, admins will be able to choose between two access settings when creating a report: admin-only or allowing any logged-in user to view the report.

Under the admin-only setting, only admins will have access to view or edit the report. This is ideal for reports that contain sensitive or confidential information that should only be seen by authorized personnel. This setting ensures that the report’s data remains secure and is only accessible by those who need it.

Under the second setting, any logged-in user can view the report, but only admins will have the ability to edit it. This is perfect for reports that contain information that is relevant to a wider group of people.

Select access settings on report creation

Global filters

With our new global filter, admins will be able to set conditions that will limit all widgets within a report dashboard to specific conditions (e.g. “client name = HP”).

The global filter feature is designed to help admins save time and increase efficiency by eliminating the need to set conditions on each widget individually. Instead, with just a few clicks, admins can set the global filter, and all widgets in the report dashboard will be automatically filtered according to the conditions set.

While the global filter is a powerful tool for managing reports, it’s important to note that admins can still add conditions to individual widgets as needed. This allows for even greater customization and flexibility in creating reports that are tailored to specific needs.

Upload and Personalize Your Company Logo and Email Banner

With this new feature, users will be able to easily customize their email communication with their clients and colleagues.

Uploading a logo and email banner will personalize your Omnitrack account, making it immediately recognizable to anyone who receives an email. This is especially important for businesses that want to maintain a consistent brand image across all communication channels.
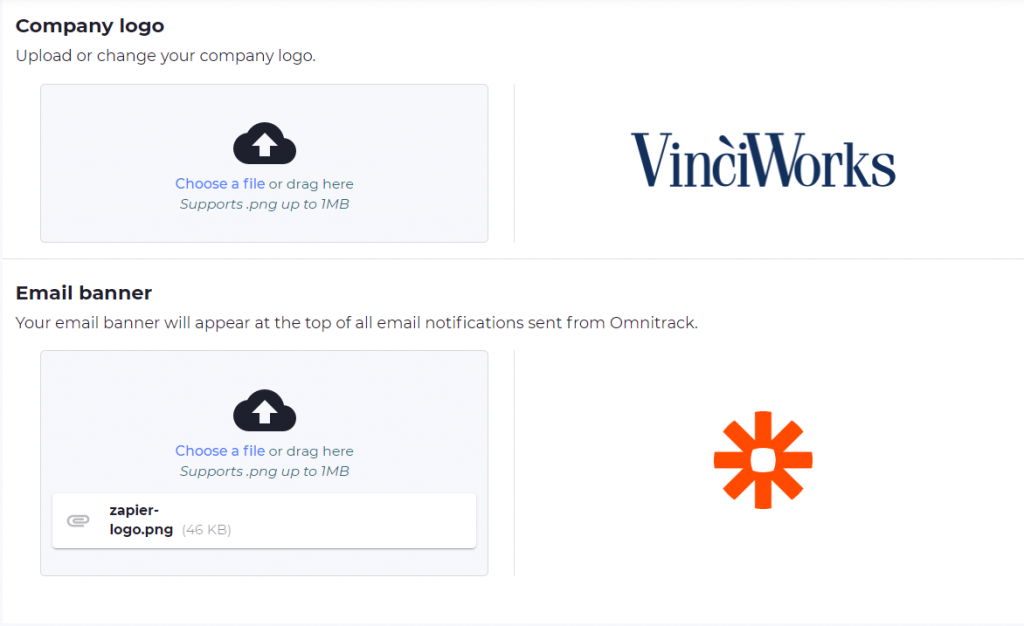
Upload logo and banner via the settings page

Users can change their company logo or email banner as often as they like, allowing them to keep their communication fresh and up-to-date.

To upload or change the company logo and email banner, users simply need to navigate to “Configuration” >> “System settings” within Omnitrack and select the appropriate option. Once the logo or banner has been uploaded, it will automatically appear at the top of any email sent out of the system.

Bug fixes

  • Fixed an issue within the logic builder on forms where edited logic on yes/no questions was not saving the first time.
  • Fixed an issue where date fields in email were appearing as UNIX timestamp.
  • Fixed an issue where automations with a “send email” action did not appear in the timeline.
  • Fixed an issue where hyperlinks were not appearing within multi select fields on forms.
  • Fixed an issue where Japanese was not exporting to PDF.
  • Added better warning text for when an email has been incorrectly modified and fails to send.

Create groups based on user creation date

Group conditions can now be set based on when a user was added to Omnitrack. For example, create a group of users who have been added within the last month and automatically send them a ‘New joiner’ survey.

Bug fixes

  • Fixed an issue where some automations triggered by submission creation were not running.
  • Fixed a display issue with usernames that include an umlaut.
  • Fixed an issue where currency fields were not displaying currency icons in PDF exports.
  • Fixed an issue where the search within the show/hide columns picker wasn’t working.
  • Fixed an issue where the invite users feature was throwing an error.

Apply submissions grid layout for all end-users

With this new feature, you can customise the grid layout of your submissions page to meet your specific business needs, and ensure that all of your end users see the same layout. This helps to create a more consistent user experience and makes it easier for your users to see high-priority data points (e.g. matter number for an AML use case). Your layout can be applied to a single status or all statuses at once.

To change your layout settings, simply log into your account and click “View submissions” on the form you’d like to apply the layout for. Here, you can customise your layout by adding, removing, or re-ordering columns. Once you’re happy with the layout, click the layout settings button on the far right-hand side and then choose your setting.

Submissions grid displaying the layout settings options

Submission timeline enhancement – ability to see when a button was clicked

Forms can be customised to include custom action buttons that are specific to your business needs. These buttons can perform a variety of functions, such as saving the form, submitting the form, or triggering custom workflows. The submission timeline will now create an event that allows you to track when a custom button is clicked and by whom. For example, if you have a custom button called “Review completed”, you’ll see an event in the timeline when that action is taken.

Submission timeline displaying a custom action

Reporting enhancement – ability to “select all” in data tables

When creating a data table in reports, you can quickly and easily select all fields, saving you time and effort.

Audit trail enhancement – track deleted forms

Forms deleted from the system will now be logged in the audit trail including the form name, date of deletion, and the name of the user who deleted the form. In addition, users will now be prompted to type the word “DELETE” when deleting a form from the system.

Bug fixes

  • Removed the word “undefined” which was appearing at the bottom of email notifications.
  • Removed the option to set new users as “form admin”.

Ability to give form admins section-specific access

We are excited to announce a new feature that will enhance the experience of managing your forms. The new feature allows you to set up admins who are responsible for specific sections of the form. Admins will be restricted to viewing only the sections they are assigned to, keeping the rest of the form confidential.

You can assign different admins to different sections of the form, ensuring that each section is managed by someone with the appropriate level of expertise. Admins will be able to view and manage the sections they are assigned to, but will not be able to access other sections of the form. You can even assign multiple admins to a single section, making it easier for you to manage larger forms with a team.

Section admin setup page

Here’s how to set up section-specific access:

  1. Go to the “Form admins” page in the form settings
  2. Click “Add section admin” to add a new admin
  3. Enter the admin’s email address or name and select the sections they should have access to
  4. Save the changes

Enhanced submission exports

The export submission feature now provides even more valuable information in your exported submissions. When you export submissions to Word or PDF, you will have access to the following information:

  1. Submission Reference ID: Uniquely identify each submission with ease
  2. Submission Status: Get a quick overview of the status of each submission
  3. Flag Status: Stay informed on any flagged submissions that need attention
  4. Assigned Users, Shared Users, Responsible Admins: See who has access to the submission and who is responsible for managing it

Bug fixes

  • Fixed an issue with custom buttons where the submit button was not appearing after the initial submission of the form
  • Fixed an issue where notification cards were duplicated on the notifications page
  • Fixed an issue where the submission timeline was not appearing for end users when the submission was a duplicate
  • Fixed an issue where customised notifications to external users were not being sent

Improvement to the ‘share’ submission automation

The automation feature allows admins to automate their workflow with logic-based actions. The share action within automations now includes the option to select a specific admin to share a submission with. The admin selected will be notified that a new submission has been shared with them. The notification will include a link to the submission on the admin side of the system instead of the end user side. To create automation, navigate to “Edit form” >> “Automations” >> “Add automation”.

Automation action for sharing with specific admins

Bug fixes

  • Fixed an issue where the ‘view changes’ link in the timeline was not working for anonymous forms
  • Fixed an issue where certain scoring fields were not working when only two options existed
  • Fixed an issue where users were landing on a login page with the message “Submission deleted” even though it wasn’t

Submission timeline redesign and improvements

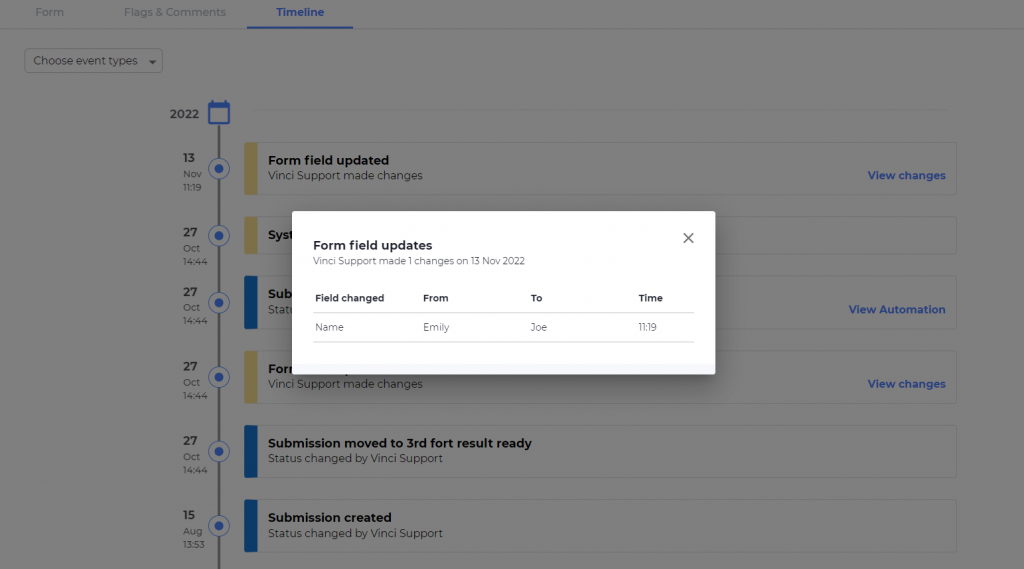
The timeline feature is essential for tracking submissions through their lifecycle. It tells you what changes were made, who made them, and when. As such, we’re happy to deliver a new and improved timeline experience that will be even more reliable and easy to use.

  1. Tracking changes just got a whole lot easier. All changes to a submission will create an update event on the timeline and clicking the “view changes” link will now display an easy-to-read list of the changes made.
  2. When an automation or reminder triggers a submission it will create a new event on the timeline. Those events now display a link back to the specific automation or reminder the event was created for. This means you can easily track down the automations that may not be working as intended.
  3. We’ve made various behind-the-scenes improvements to ensure the reliability of the timeline event creation and order.
  4. Automations using the “webhook” action will create a webhook event on the timeline that includes the webhook status.
Timeline view after clicking on a view changes link

New public API added

We’ve added a new public API for updating the value of a user lookup field. API documentation can be viewed in the ‘Configuration’ page of your Omnitrack system.

Penetration test completed

As part of a periodic security tests routine, VinciWorks regularly performs penetration tests by independent security companies who conduct both a grey-box and black-box review. The goal of these tests is to simulate an external invasion of VinciWorks’ infrastructure and application levels, in order to examine the soundness of the existing security and defence methods and to locate weaknesses in the communication, application, database and operating system levels that are available to potential attackers.

Bug fixes

  • Fixed an issue where the user’s page was not displaying the correct information under the ‘added via’ column
  • Fixed an issue where some anonymous forms were redirecting to the login page

Features

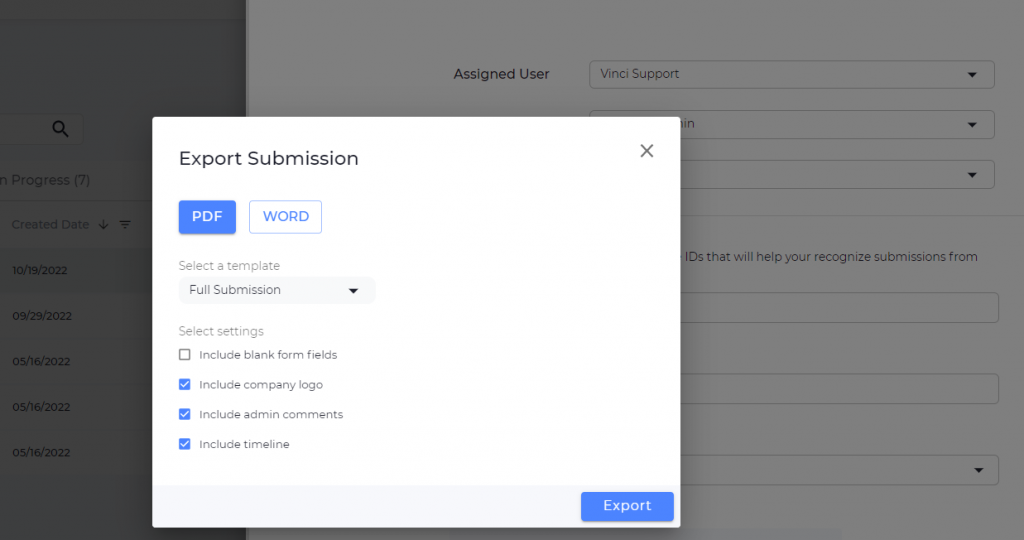
We’ve redesigned the export submissions experience to give you more options when exporting. You’ll now see settings for including company logos, admin comments, and a full submission timeline in your exports. To export submission, click into the submission you want to export >> click the 3 dots menu at the top right >> select export.

Bug fixes

  • Fixed an issue where scoring fields did not work for numbers with decimals in them.
  • Fixed an issue where file uploads were not working for certain file types (.msg and .docx)

Features

End users who open a submission that has been deleted by admin will now see an error message instead of a blank page. The error message reduces confusion by telling the end user why they can’t access the submission.

Bug fixes

  • Fixed an issue where end users could not export a copy of their submissions.
  • Fixed an issue where specific automation emails were using the default template instead of the edited version.
  • Fixed an issue where the ‘change assigned user’ action in automations was not sending out an email notification.
  • Fixed an issue where the count of submissions in a specific status was not accurate.

Submission timelines are now exportable

Admins and End users can now export a PDF version submission timelines. The export will include the submissions reference ID and date of export. Simply click into a submission >> click into the ‘timeline’ tab >> click the export button. Note that you can filter the timeline for specific events before exporting it to PDF.

PDF version of the submission timeline

Submission reference IDs in email notifications

Email notification links have all been standardised to display submission reference IDs by default. The reference ID is also available as a field placeholder for users who would like to customise email notifications. To view or edit email notifications navigate to “Edit Form” >> select “Notifications” from the menu >> click the edit icon on the template you’d like to edit or view.

Select the referenceID placeholder to add it to your template

Bug fixes

  • Fixed an issue where description text logic including an “is blank” condition was not working as expected.
  • Fixed an issue where some email notifications appended an extra ‘1’ to the end of links.
  • Fixed an issue where automations were using the default email template after it has been edited.
  • Fixed an issue where in some cases exported data was showing in the wrong column of the CSV.

Submission reference IDs in the audit trail

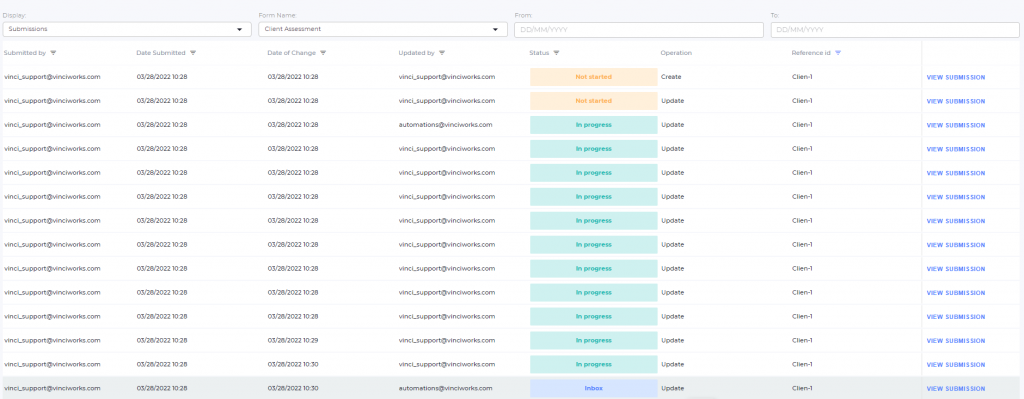
The audit trail for submissions now displays the reference ID as a column in the grid. Users can now sort, filter, and search for a particular ID in order to view the full history on any submission.

Audit trail filtered by reference ID to view a specific submission

Ability to filter by a date range

All date columns in tables now have the option to filter for a date range. For example, if you have a field called ‘Due date’ in your submissions table you can now filter the submissions where the due date falls into a specific range. Simply click the filter icon next to a date column >> select ‘between’ from the dropdown >> input two dates.

Filtering by a date range in the submissions page

Bug fixes

  • Fixed an issue where some submissions were still visible to form admins who were restricted to a specific status and shouldn’t have access.
  • Fixed an issue with scoring calculations in form builder where changing a dropdown value caused an inaccurate result.
  • Fixed an issue where deleted from admins still appeared in the form admins list.